
Your brand photoshoot is just around the corner…are you ready?
As a business owner or entrepreneur, your personal brand is everything. Your images should convey professionalism, confidence, and authenticity, all while making a powerful first impression. But walking into a photoshoot unprepared can lead to wasted time, missed opportunities, and lacklustre results.
Don’t worry, I’ve got you covered. Below are five crucial steps to ensure you show up fully prepared, confident, and ready to slay your brand session. Plus, I’ll share pro tips to maximize your investment and get the most variety from your shoot.

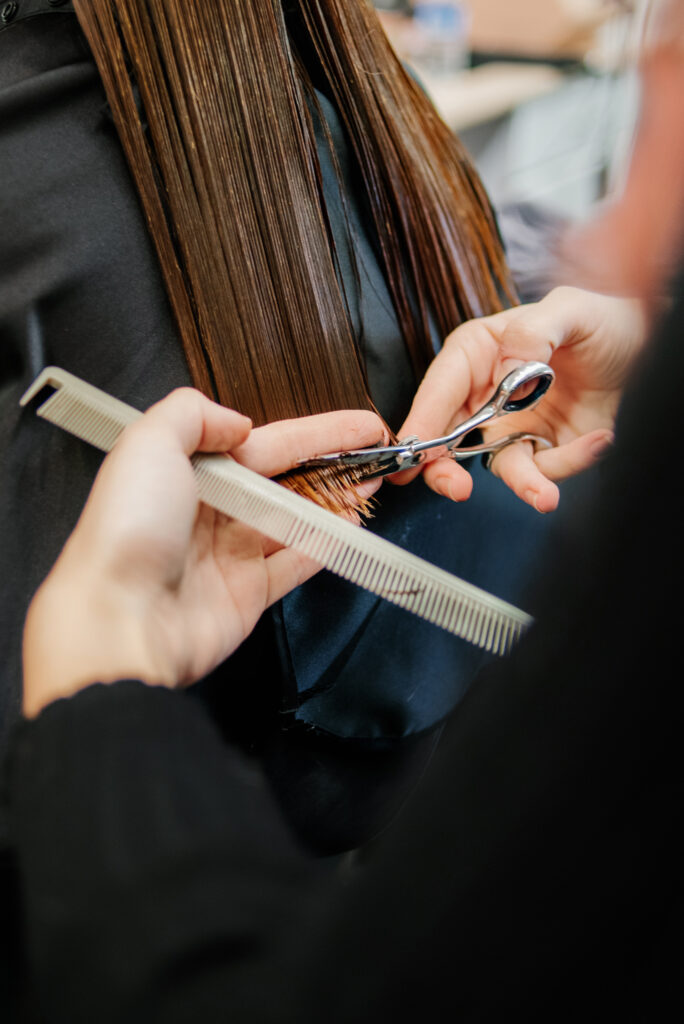
1. Pamper Yourself Like the CEO You Are
Your brand photos are a strategic business investment, not just pretty pictures. You want to look polished, professional, and camera-ready from every angle.
How to Prep Like a Pro:
✔ Schedule hair & makeup – Whether you DIY or hire a pro, ensure your look is fresh and on-brand.
✔ Manicure matters – Choose a neutral or brand-complementing nail colour.
✔ Brows & skincare – Shape your brows and hydrate your skin for a flawless close-up.
PRO TIP: Ask your brand photographer if they have a preferred HMUA (hair and makeup artist) team. Professionals ensure a seamless, stress-free experience and they know how makeup translates on camera. *Click on the links above for my favourite beauty shops.

2. Prioritize Your Health
Imagine waking up on shoot day with puffy eyes, a breakout, or, worst-case scenario, a full-blown cold. Can I call in sick?
How to Stay Shoot-Ready:
✔ Hydrate like it’s your job – Glowing skin starts from within.
✔ Sleep like a boss – Dark circles don’t scream “trustworthy entrepreneur.”
✔ Eat clean(ish) – Skip the salty snacks and sugar crashes before your shoot.
PRO TIP: Pack healthy snacks (nuts, fruit, protein bars) and water for the shoot. A hangry expression won’t land you on the cover of Forbes, fuel up!
3. Organize Your Outfits & Props Like a Stylist
Nothing kills a photoshoot vibe faster than wrinkled clothes, missing accessories, or frantic outfit changes. Be strategic.
How to Master Outfit Prep:
✔ Plan full looks in advance – Outfits, shoes, jewellery…everything.
✔ Use garment bags – Keep clothes wrinkle-free and organized.
✔ Snap reference photos – Take pics of each look (or try them on!) to streamline shoot day.
PRO TIP: Organize outfits by location (e.g., office setup, outdoor shots) to save time. Bonus: Bring a steamer for last-minute touch-ups.


4. Practice Posing (Yes, Really!)
Awkward poses = awkward photos. No one has time for that.
How to Nail Your Angles:
✔ Find your best side – Most people have one (ask your photographer!).
✔ Study posing inspo – Pinterest is gold for natural, confident brand poses.
✔ Move naturally – Stiff = unapproachable. Relaxed = magnetic.
PRO TIP: Your phone is the ultimate posing coach! Practice in the mirror, snap test shots, then poof: delete the ones you hate. (No judgment here!)
But here’s the real secret: Selfie mode lies. The back camera (the one your photographer uses) shows the real you, angles, lighting, and all. So train with it! Nail your expressions, find your best stance, and soon, you’ll be serving CEO energy without even trying.

5. Get in the Right Mindset
Even the most camera-shy entrepreneurs can radiate confidence with the right mindset prep.
How to Channel Your Inner CEO:
✔ Meditate or visualize success – See yourself rocking the shoot.
✔ Affirmations work – “I am confident, powerful, and photogenic.”
✔ Pump-up playlist – Blast your hype songs on the way there.
PRO TIP: Many photographers (including me!) let clients play their favourite music during the shoot. Want to strut like Beyoncé? Press play.

Final Thought: Ready to Own Your Brand Shoot?
Your brand photos are more than just pictures; they’re a powerful tool for attracting clients, building trust, and growing your business. By following these five steps, you’ll walk into your shoot feeling prepared, confident, and unstoppable.
Now, go forth and slay like the visionary entrepreneur you are. And if you need a photographer who’ll make you look like a million bucks (without the awkward “say cheese” moments), you know where to find me.
P.S. Don’t forget to bring your favorite lipstick and maybe a prop that screams, “I run this.” 🔥

Ready to book your branding session?
Contact me for more information or to book your session!
‘Tis the season for twinkling lights, cozy sweaters, and family fun! And what’s more festive than a photo of your little ones in front of the Christmas tree? But let’s be real, wrangling kids and getting a great shot can be a bit of a challenge, especially in the low light of winter. Here are my top tips (DSLR camera or several of these are also helpful when using your iPhone) on how to get some great photos of your kiddos by the tree this year.
PHOTOGRAPH DURING THE DAY
You might think the best time to take these photos is at night, but actually, all the photos in this post were taken around 10am! The key is to find good lighting. You need enough light to capture the sparkle of the Christmas lights and to illuminate your little ones.
1) Natural light: If possible, position the tree near a window to utilize natural light. This will create a soft, warm glow. Turn off all other light sources (except the tree lights). Open every window so that light will pour in!
2) Exposure tip: Expose for the brightest part of their face, usually the cheekbone closest to the window. To do this on your iPhone, just touch that area and the exposure will adjust. Turn up your ISO. Being indoors means it’s likely darker. Start with an ISO of 800 and go up if necessary.
3) Candid shots: Don’t just pose your child. Capture spontaneous moments of laughter, play, or wonder. or directed poses: For more formal portraits, try simple poses like sitting or standing next to the tree.
4) Experiment with angles: Get LOW! Shooting from a low point means you get more lights and less floor, plus you’ll get a child’s perspective of the tree.
5) Use a tripod: A tripod can help you take sharp, steady photos, especially in low-light conditions. Use a self-timer to include yourself in the photo. Be sure to use the lowest f-stop you can (2.8 is preferred) and a higher shutter speed (250 or higher, any lower and you will risk getting blurry images due to camera shake) to capture those wiggly kiddos!
7) Incorporate Props: Have them DO or HOLD something. Sing a Christmas carol, eat a candy cane, hold a present, or look for their favourite ornament. I also love the small battery-powered twinkle lights; they keep the kids busy and always look great! Your photos will be more authentic this way.

By following these tips, you can capture beautiful and heartwarming photos of your children that you’ll cherish for years to come.
There are various digital photo storage options; the only thing to remember is to always back up your photos. Whether on an SD card or your phone, you never want to lose those moments and memories. Here are a few ideas for getting your photos safely backed up!
Uploading digital photos to a cloud storage service like Google Drive, Dropbox, or iCloud is the quickest and most hassle-free way to make them available to loved ones far and wide. You can make a special album for your pictures and then send the link to your loved ones. If you have Amazon Prime you may not know you have access to cloud storage, but you do! (This is how I back up my iPhone images and using the app on my phone it’s so easy.)


You can also keep your digital photos on external hard drives or USB flash drives or I like a solid state drive if I’m travelling, which are examples of physical photo storage devices. Transferring the storage device to family members is more secure than using an online cloud service.


Sharing digital photographs with loved ones is now easier than ever thanks to social media sites like Facebook, Instagram, and Flickr. Those close to you can be invited to a secret group or album you make.


Displaying your digital photographs in a digital photo frame is a wonderful option for decorating your home or workplace. This digital photo frame is perfect for displaying and gifting your favourite digital photographs to friends and loved ones.


If you care about keeping your digital photos safe and easily accessible for years to come, you should always back them up in more than one location.
